Around 10 years ago, I wrote a tutorial on using Zotero with Scrivener through the RTF/ODF plugin. This method was fiddly, but ultimately produced live Zotero citations in a Word or OpenOffice document. When Zotero 7 was launched, this method no longer worked. I updated my tutorial with a doom-laden reflection on why this problem was unlikely to be solved. Happily, the developers of the original plugin have not only updated it but also made it much better than the original. It’s now called ODF/DOCX Scan for Zotero. I’m grateful to Sebastian Karcher and the other volunteers for all their work and also to Professor Michael Cantinotti for alerting me to the update.
In my previous post, I described a simple Zotero-Scrivener workflow, using the RTF Scan tool. Here, I’ll explain how to use the updated ODF/DOCX Scan plugin. This approach is slightly more complicated, but much more sophisticated.
Step 1 - Download the plugin
To download the plugin, go to the GitHub repository and click on the latest release. You want the file with the .xpi extension.
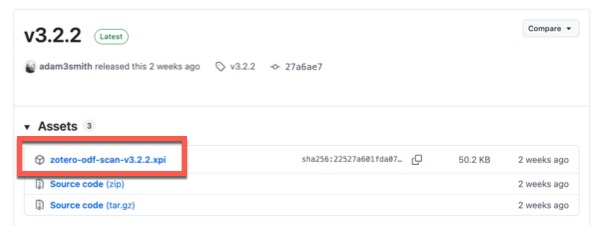
Step 2 - Install the plugin in Zotero
In Zotero:
- Click Tools > Plugins.
- Click the cogwheel icon in the top right and choose Install Plugin from File.
- Locate the file you downloaded.
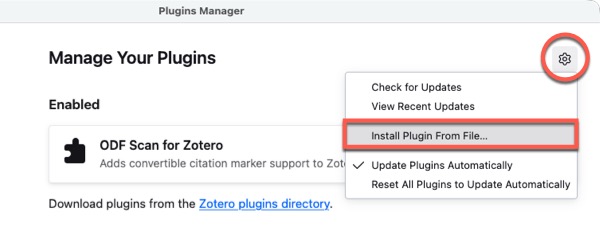
Step 3 - Configure the plugin
The plugin works partly by creating placeholders in a scannable format that are replaced by citations. You need to tell Zotero to use this format.
In Zotero:
- Go to Settings.
- Click the Export tab.
- Under Item Format, change it to Scannable Cite.
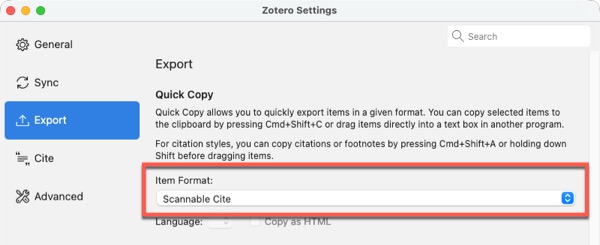
Step 4 - Insert placeholders in your Scrivener document
There are two methods for inserting placeholders:
- Click and drag them from Zotero into your Scrivener footnote.
- Select the item in Zotero, use the quick copy keyboard shortcut, then paste it into your Scrivener footnote.
The keyboard shortcut is Cmd + Shift + C (Mac) Ctrl + Shift + C (Windows).
Your placeholders will look like this:
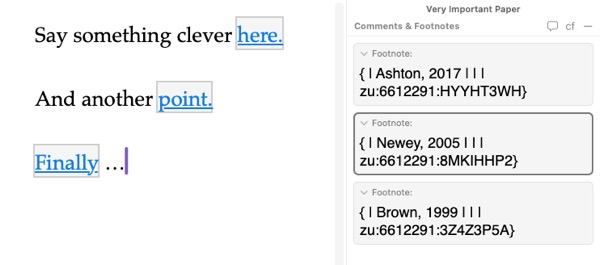
You can now edit them to include additional information.
If you peer closely at this expanded example, you’ll see there are five fields, separated by a | (pipe) character.

Here’s what they each do:
- Prefix (e.g. “Cited in”)
- Displayed citation (author, year)
- Locator (e.g. “p. 23”, “ch. 2”)
- Suffix (e.g. “original emphasis”)
- Item URI (this is what the plugin uses to link to Zotero, so do not modify this field).
A fully populated placeholder might look like this: {Cited in |Ashton, 2017|p. 23| (original emphasis)|zu:6612291:HYYHT3WH}
There are more instructions and options on the plugin homepage.
When you’ve finished adding your placeholders, export your Scrivener project as a .docx file if you’re using Word, or .odt if you’re using OpenOffice or LibreOffice.
ℹ️ You can use ODF/DOCX Scan with either Word or OpenOffice/LibreOffice. In the previous version, you had to use OpenOffice and then convert your document, so this is a big improvement for Word users.
Step 5 - Scan your document
Once you’ve exported your Scrivener project with the placeholders, you’re ready to replace them with citations.
In Zotero:
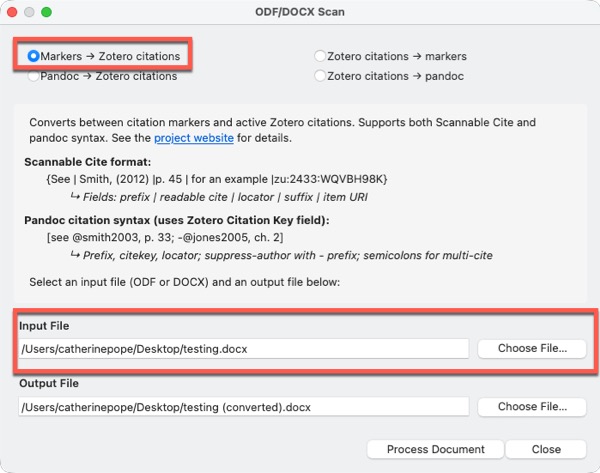
- Click Tools > ODF Scan.
- Ensure Markers -> Zotero citations is selected.
- Choose your document with the placeholders as the Input File (by default, the plugin automatically creates an output file by adding
(converted)to the filename). - Click Process Document.
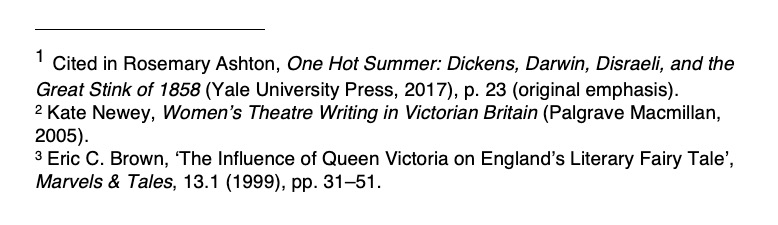
When you open the processed document, you should see those placeholders have been replaced with citations.
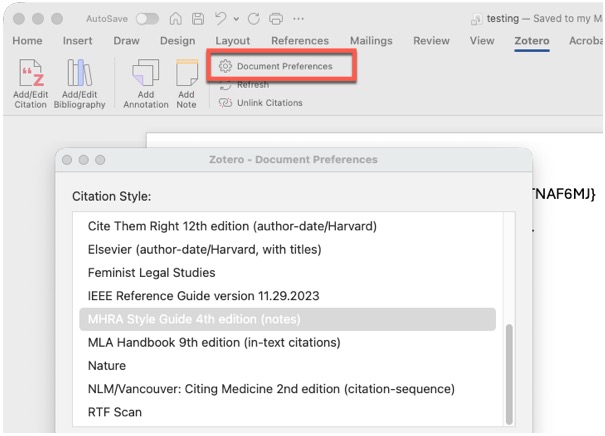
The citation format will be whatever you’ve specified for that document. You can change this format in Document Preferences on the Zotero toolbar.
Conclusion
I’m delighted this workflow is functioning again. When the plugin initially broke with Zotero 7, I spent a significant amount of time investigating alternatives to both Zotero and Scrivener. All paths led to a lot of frustration and not enough writing. I still don’t think we’ll ever get full integration between these tools, or an alternative that does everything we need. For now, though, this makes life easier. A big thank you to everyone who has made it possible 🙏🏼
Stuck with Scrivener? I offer 1-2-1 coaching on building your confidence and improving your workflow.